Building Base Infrastructure: Hub and Spoke Topology
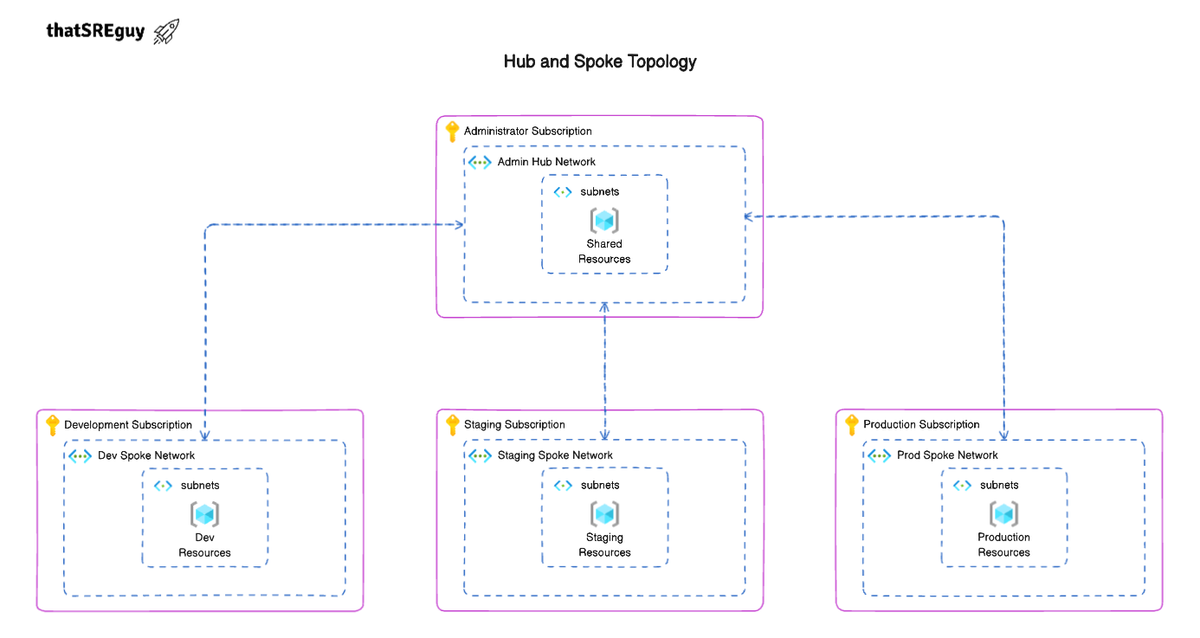
Table of Contents
- Introduction
- What You’ll Build
- Prerequisites
- Project Structure
- Terraform Backend Setup
- Hub Network Design
- Spoke Network Design
- Setting Up Environment-Specific Network Configurations
- Provisioning the Infrastructure
- Conclusion
Introduction
Over the last few years, infrastructure management has evolved from manual provisioning to highly automated, repeatable workflows. And as teams move deeper into the cloud, it's become clear that doing things “by hand” just doesn’t scale. That’s where Infrastructure as Code (IaC) comes in, and Terraform has quickly become one of the go-to tools for getting it right.
This post kicks off a hands-on guide to building base infrastructure on Microsoft Azure using Terraform. But we’re not just talking about creating a few resources and calling it a day. The goal here is to lay the groundwork for the next projects to come, something modular, reusable, and scalable, with the flexibility to support real workloads across multiple environments and subscriptions.
We’ll be following a Hub-and-Spoke topology, which is widely used in the industry and very suitable for our use case moving forward. It helps keep things organized: shared services like firewalls, DNS zones, monitoring tools, and key management live in the Hub (typically under an Admin subscription), while application environments like Development, Staging, and Production reside in isolated Spoke subscriptions. It’s clean, scalable, and easier to manage in the long run.
If you’re just starting with Terraform on Azure, or you’re looking to build a solid foundation for more complex infrastructure, this guide should help you connect the dots, from IaC basics to a multi-subscription production-ready architecture.
What You’ll Build
In this guide, you'll learn how to build a modular, production-ready base infrastructure on Microsoft Azure using Terraform, following a Hub-and-Spoke architecture pattern across multiple subscriptions.
By the end of this post, you’ll have:
- A centralized Hub Virtual Network (VNet) in the Admin subscription (with shared services like Private DNS Zones and Azure Key Vault to be covered in the next chapter)
- Spoke VNets for Development, Staging, and Production environments, each isolated within its own dedicated Azure subscription
- Secure, bi-directional VNet peering between the Hub and each Spoke
- A remote backend configuration for Terraform state management, enabling safe collaboration and CI/CD workflows
- A well-structured, reusable Terraform project layout that scales across teams and environments.
Prerequisites
Before we start writing Terraform code or provisioning resources, let’s make sure everything is set up correctly. These are the essential tools and services you'll need in place before diving into the infrastructure build.
Azure Account Setup
You’ll need access to a Microsoft Azure tenant with at least four subscriptions, one each for:
- Admin (Hub)
- Development (Spoke)
- Staging (Spoke)
- Production (Spoke)
If you don’t have subscriptions created yet, you can start with a free tier at portal.azure.com. This guide assumes you have Contributor access (or higher) to each subscription so you can create and manage resources.
Installing Terraform
Terraform is the core tool we'll be using throughout this setup.
You can download the latest version for your operating system (OS) from the official site:
👉 https://developer.hashicorp.com/terraform/downloads
Once installed, verify it by running:
terraform -version
You should see the installed version printed in your terminal.
Setting Up Azure CLI
Terraform will use Azure CLI behind the scenes to authenticate and interact with your Azure resources.
Install it from:
👉 https://learn.microsoft.com/en-us/cli/azure/install-azure-cli
After installing, sign in using:
az login
This will open a browser window where you can log into your Azure account. After a successful login, the CLI will store your credentials locally.
💡 You can use az account set --subscription "<subscription-id>" to switch between subscriptions when testing locally.Recommended IDE or Code Editor
While any text editor works, using an IDE like Visual Studio Code (VS Code) can make your life a lot easier, especially when working with .tf files.
Recommended extensions for this project:
- Terraform by HashiCorp, for syntax highlighting, linting, and IntelliSense
Project Structure
Before getting into the actual resource provisioning, it's best to take a step back and think about how you would organize your Terraform project. A well-structured codebase isn’t just about neat folders, it directly impacts how scalable, reusable, and maintainable your infrastructure becomes over time.
Organizing Terraform Files and Directories
In small setups, it might be tempting to throw everything into a single .tf file. But as things grow, that quickly becomes unmanageable. A better approach is to split your configuration into logical components, things like networking, compute, security, and monitoring, each in its own folder or module.
Here’s our desired project directory structure to start with:
terraform-base-infrastructure/
├── environments/
│   ├── admin_network/              # Admin subscription (Hub network)
│   │   ├── backend.tf              # Backend config for remote state (Hub)
│   │   ├── locals.tf               # Naming/tagging conventions for Hub
│   │   ├── main.tf                 # Main module calls for Hub infrastructure
│   │   ├── providers.tf            # Provider config (Hub-specific)
│   │   ├── terraform.tfvars        # Hub-specific variable values
│   │   └── variables.tf            # Input variable declarations for Hub
│   ├── dev_network/                # Development environment (Spoke)
│   │   ├── backend.tf
│   │   ├── locals.tf
│   │   ├── main.tf
│   │   ├── providers.tf
│   │   ├── terraform.tfvars
│   │   └── variables.tf
│   ├── staging_network/            # Staging environment (Spoke)
│   │
│   └── prod_network/               # Production environment (Spoke)
│

├── modules/
│   ├── hub_network/                # Hub VNet, subnets, peering, etc.
│   └── spoke_network/              # Spoke VNet, subnets, VNet peering logic
Each environment, including Admin (Hub), development, staging, and production, contains its own isolated set of Terraform configuration files. Each also has a separate backend.tf, so the state files remain fully separated, which is a best practice for managing multiple environments independently.
All environments reuse common logic and modules from the modules/ directory to avoid duplication and promote scalability.
Backend Configuration
It’s always a good idea to configure a remote backend right from the start. In most real-world setups, you'll want to store your Terraform state in a central location, like in this case Azure Blob Storage, rather than keeping it locally on your machine. This helps with collaboration and reduces the risk of state corruption or loss.
Setting up your backend early also sets the stage for proper environment management, CI/CD pipelines, and team workflows.
Modular Design for Reusable Infrastructure
Think of modules as building blocks. Instead of repeating the same code across environments or teams, you can create modules for things like a Virtual Network (VNet), VM setup, or security group configuration, and call them as needed.
This approach not only keeps your code DRY (Don't Repeat Yourself), but also makes onboarding, scaling, and updating infrastructure a lot smoother down the line.
Hub-and-Spoke Layout Overview
Since we’re following a Hub-and-Spoke topology, it’s a good idea to structure your modules and environments with that in mind. The Hub network, where shared services live, can be its standalone module, while each Spoke can represent an individual environment or workload.
By keeping this separation clear from the beginning, you make it easier to manage routing, peering, and access control. without creating tangled dependencies between unrelated resources.
Hub Network Design
In a Hub-and-Spoke architecture, the Hub Virtual Network (VNet) acts as the central point for shared infrastructure services that multiple workloads (Spokes) need to access. This design allows you to centralize and simplify network management, security policies, and resource access across your cloud environment.
Rather than duplicating services across each environment or application workload, the Hub VNet provides a common space for components like DNS, firewalls, monitoring tools, and bastion hosts. It becomes the foundation of your network topology, especially in a multi-subscription setup, where shared services are hosted in a centralized Admin subscription.
Creating the Hub Virtual Network (VNet) Module
The first step is to create a dedicated, reusable Terraform module for the Hub network. This module will be responsible for provisioning the Hub VNet, its subnets, and the associated resource group, all within the Admin subscription.
Module Structure:
terraform-base-infrastructure/
└── modules/
    └── admin-network/
        ├── main.tf              # Defines the VNet and subnets
        ├── resource_group.tf    # Creates the resource group for the Hub
        ├── variables.tf         # Input variables for VNet, subnets, and location
        ├── outputs.tf           # Output values like VNet ID, subnet IDs
        └── locals.tf            # Local naming conventions and reusable logic
Let’s Dive Into the Code
📄 main.tf
resource "azurerm_virtual_network" "this" {
  count = length(var.vnet_address_spaces) > 0 ? 1 : 0

  name                = "${local.resource_prefix}-vnet"
  location            = azurerm_resource_group.this.location
  resource_group_name = azurerm_resource_group.this.name
  address_space       = [var.vnet_address_spaces]
  tags                = var.tags
}
- Creates the Spoke VNet using a dynamic naming convention (
local.resource_prefix) and configurable address space. - Uses
countto conditionally create the VNet if address space is provided.
resource "azurerm_subnet" "this" {
  count = length(var.subnet_names)

  name                 = "${var.subnet_names[count.index]}"
  resource_group_name  = azurerm_resource_group.this.name
  virtual_network_name = azurerm_virtual_network.this[0].name
  address_prefixes     = var.subnet_names != "" ? [cidrsubnet(var.vnet_address_spaces, 8, count.index + 1)] : []
}
- Defines multiple subnets dynamically, based on the
subnet_nameslist. - Each subnet's address prefix is derived from the VNet CIDR block using
cidrsubnet().
💡 Note:cidrsubnet()helps segment your network address space cleanly (e.g., from10.0.0.0/16, it generates10.0.1.0/24,10.0.2.0/24, etc., based on the index).
This module also includes supporting files likevariables.tf,outputs.tf, andresource_group.tfto promote modularity and reuse. But to keep this post focused, we’ve highlighted just the main logic here. You can explore the complete module structure in the GitHub repository modules/hub_network
Spoke Network Design
In a Hub-and-Spoke topology, the Spoke Virtual Networks (VNets) serve as isolated environments where application workloads live, separate from the shared services hosted in the Hub. This design not only helps with network segmentation and security, but also makes scaling, environment isolation, and governance much cleaner in a cloud-native setup.
Each Spoke VNet typically represents a dedicated environment, such as Development, Staging, or Production, or even separate application domains, depending on how your infrastructure is structured. In a multi-subscription model, each Spoke environment is deployed into its own Azure subscription, further enforcing isolation and security boundaries.
Creating Spoke VNets for Workload Isolation
Just like the Hub, each Spoke environment will have:
- Its own Virtual Network, typically with a smaller IP address space
- A set of subnets tailored to application workloads
- VNet peering with the Hub, enabling access to shared services hosted in the Admin subscription
- Optional Private DNS zone links to resolve internal names centrally via the Hub's DNS zone
Key criteria for the Spoke Network module:
- Provision a Spoke Virtual Network and subnets
- Support bi-directional VNet peering with the Hub
- Example:
hub-vnet-to-dev-vnet-peering↔dev-vnet-to-hub-vnet-peering
- Example:
- Support Private DNS zone linking, if enabled (part 2)
- Ensure cross-subscription compatibility, with proper provider aliasing (
azurerm.this,azurerm.hub)
📁 Module Structure:
terraform-base-infrastructure/
└── modules/
    └── spoke-network/
        ├── main.tf              # Defines the VNet, subnets, VNet peering, and DNS links
        ├── resource_group.tf    # Creates the resource group for the spoke environment
        ├── variables.tf         # Input variables (VNet config, tags, location, etc.)
        ├── outputs.tf           # Output values (VNet ID, subnet IDs, peering info)
        ├── locals.tf            # Local naming and tagging conventions
        └── data.tf              # Data sources to reference the Hub VNet
Let’s Dive Into the Code
📄 main.tf
resource "azurerm_virtual_network" "this" {
  count = length(var.vnet_address_spaces) > 0 ? 1 : 0

  name                = "${local.resource_prefix}-vnet"
  location            = azurerm_resource_group.this.location
  resource_group_name = azurerm_resource_group.this.name
  address_space       = [var.vnet_address_spaces]
  tags                = var.tags
}
- Creates the Spoke VNet using a dynamic naming convention (
local.resource_prefix) and configurable address space. - Uses
countto conditionally create the VNet if address space is provided.
resource "azurerm_subnet" "this" {
  count = length(var.subnet_names)

  name                 = "${var.subnet_names[count.index]}"
  resource_group_name  = azurerm_resource_group.this.name
  virtual_network_name = azurerm_virtual_network.this[0].name
  address_prefixes     = var.subnet_names != "" ? [cidrsubnet(var.vnet_address_spaces, 8, count.index + 1)] : []
}
- Defines multiple subnets dynamically, based on the
subnet_nameslist. - Each subnet's address prefix is derived from the VNet CIDR block using
cidrsubnet().
resource "azurerm_virtual_network_peering" "hub-to-spoke" {
  provider                    = azurerm.hub
  count                       = var.enable_vnet_peering ? 1 : 0
  name                        = "${data.azurerm_virtual_network.hub_virtual_network.name}-to-${azurerm_virtual_network.this[0].name}-peering"
  virtual_network_name        = data.azurerm_virtual_network.hub_virtual_network.name
  resource_group_name         = data.azurerm_virtual_network.hub_virtual_network.resource_group_name
  remote_virtual_network_id   = azurerm_virtual_network.this[0].id
  allow_forwarded_traffic     = var.allow_forwarded_traffic
  allow_virtual_network_access = var.allow_virtual_network_access
  allow_gateway_transit       = var.allow_gateway_transit
}
- Creates a peering from Hub to Spoke, using the
azurerm.hubprovider. - References the Hub VNet via data source, enabling cross-subscription peering.
- Controlled by
enable_vnet_peeringflag.
resource "azurerm_virtual_network_peering" "spoke-to-hub" {
  count                        = var.enable_vnet_peering ? 1 : 0
  name                         = "${azurerm_virtual_network.this[0].name}-to-${var.hub_virtual_network_name}-peering"
  virtual_network_name         = azurerm_virtual_network.this[0].name
  resource_group_name          = azurerm_resource_group.this.name
  remote_virtual_network_id    = data.azurerm_virtual_network.hub_virtual_network.id
  allow_forwarded_traffic      = var.allow_forwarded_traffic
  allow_virtual_network_access = var.allow_virtual_network_access
  allow_gateway_transit        = var.allow_gateway_transit

  depends_on = [
    azurerm_virtual_network_peering.hub-to-spoke,
    azurerm_virtual_network.this
  ]
}
- Creates the reverse peering (Spoke → Hub) for bi-directional traffic flow.
- Uses
depends_onto ensure the Hub-to-Spoke peering and VNet are created first. - Again, peering is controlled via a toggle flag
enable_vnet_peering.`
📄 data.tf
data "azurerm_virtual_network" "hub_virtual_network" {
  provider            = azurerm.hub
  name                = var.hub_virtual_network_name
  resource_group_name = var.hub_virtual_network_rg
}
- This data source fetches details of the Hub VNet from the Admin (Hub) subscription using the
azurerm.hubprovider alias. - It's required so the Spoke can peer to the Hub, even though they're managed from different subscriptions.
This module also includes supporting files likevariables.tf,outputs.tf, andresource_group.tfto promote modularity and reuse. But to keep this post focused, we’ve highlighted just the main logic here. You can explore the complete module structure in the GitHub repository modules/spoke_network
Terraform Backend Setup
One of the most important (but often overlooked) parts of any Terraform project is how you manage your state file. This file keeps track of what infrastructure Terraform has created, so it knows what to change (or not change) the next time you run a plan or apply.
By default, Terraform stores this state file locally, but in team environments or production-grade setups, that’s far from ideal. You need a way to store state centrally, securely, and in a way that supports collaboration and version control.
Why Use a Remote Backend?
Using a remote backend ensures that:
- Your state file is always accessible from any machine or pipeline.
- Multiple users (or CI/CD pipelines) don’t overwrite each other’s changes.
- You get state locking, so only one
applycan happen at a time. - Your infrastructure changes are tracked and auditable.
In our case, we’ll use Azure Blob Storage to store the state file and enable locking using Azure Storage Account containers.
Setting Up Azure Blob Storage for Terraform State
Here’s what you’ll need to provision:
- A Resource Group
- A Storage Account
- A Blob Container
You can create them manually via the Azure portal, but we’ll be provisioning them using the Azure CLI for automation.
CLI Commands:
# Create Resource Group
az group create --name terraform-state-rg --location eastus

# Create Storage Account
az storage account create \
  --name thatsreguytfstatefilesa \
  --resource-group terraform-state-rg \
  --location eastus \
  --sku Standard_LRS \
  --encryption-services blob

# Create Blob Container
az storage container create \
  --name tfstate \
  --account-name thatsreguytfstatefilesa
Backend Configuration File: backend.tf
Once the storage resources are in place, your backend.tf file in each environment folder (e.g., admin_network/, dev_network/, staging_network/) will define the backend configuration.
terraform {
  backend "azurerm" {
    resource_group_name  = "terraform-state-rg"
    storage_account_name = "thatsreguytfstatefilesa"
    container_name       = "tfstate"
    key                  = "admin-network/terraform.tfstate"
  }
}
📌 Note: The key acts like a path or namespace inside the container. You can customize it per project, environment, or module. For example:
admin-network/terraform.tfstatedev-network/terraform.tfstatestaging-network/terraform.tfstateprod-network/terraform.tfstate
Provider Configuration File: providers.tf
You should also define your Azure provider configuration in a separate file named providers.tf. This helps keep things modular, reusable, and consistent across environments.
📄 providers.tf:
terraform {
  required_providers {
    azurerm = {
      source  = "hashicorp/azurerm"
      version = "~> 3.0"
    }
  }
}

provider "azurerm" {
  features = {}
}
Initializing the Backend
After adding the backend.tf file to your environment, initialize the backend using:
terraform init
Terraform will connect to your Azure Storage account, check the container, and associate your project with the correct state file. If the state file doesn’t exist yet, it will be created automatically.
Setting Up Environment-Specific Network Configurations
With our Hub and Spoke modules in place, it’s time to see how they are used in practice to provision actual environment-specific networks, such as admin_network, dev_network, staging_network, and prod_network.
As mentioned earlier, each environment resides in its own folder under the environments/ directory and contains its own Terraform configuration files:
backend.tf– defines remote state storage configurationproviders.tf– sets the subscription context for the environmentterraform.tfvars– holds environment-specific variable valuesmain.tf– consumes reusable modulesvariables.tfandlocals.tf– define input variables and tagging conventions
This design ensures full environment isolation, clear separation of concerns, and is fully aligned with multi-subscription best practices.
💡 Note: In a CI/CD automation context, you don't necessarily need to hardcode all environment folders in the repo. You can dynamically provision environments in the pipeline using injected variables.
📁 Environment Folder Structure
environments/
├── admin_network/
│   ├── backend.tf         # Remote state configuration for the Hub environment
│   ├── locals.tf          # Local values for tags, naming conventions, etc.
│   ├── main.tf            # Module block to call the hub_network module
│   ├── providers.tf       # Azure provider configuration and aliases (for multi-subscription)
│   ├── terraform.tfvars   # Environment-specific variable values
│   └── variables.tf       # Input variable declarations for the module
├── dev_network/
│   ├── backend.tf
│   ├── locals.tf
│   ├── main.tf
│   ├── providers.tf
│   ├── terraform.tfvars
│   └── variables.tf
Using the Hub Module – admin_network
📄 providers.tf
terraform {
  required_providers {
    azurerm = {
      source  = "hashicorp/azurerm"
      version = "~> 3.0"
      configuration_aliases = [azurerm.hub]
    }
  }
}

provider "azurerm" {
  features {}
}

provider "azurerm" {
  alias           = "hub"
  subscription_id = var.subscription_id
  features        = {}
}
Explanation:
- Declares
azurermas the required provider. - Adds a provider alias
azurerm.hub, which will be used inmain.tfto specify that this environment is running in the Admin (Hub) subscription. - This allows full control over the subscription context, which is especially important in multi-subscription deployments.
📄 main.tf
module "virtual_network_hub" {
  providers = {
    azurerm = azurerm.hub
  }

  source              = "../../modules/hub_network"
  organization        = var.organization
  vnet_address_spaces = var.vnet_address_spaces
  subnet_names        = var.subnet_names
  environment         = var.environment
  location            = var.location

  tags = merge(local.base_tags, {
    environment = var.environment
    TF_Module   = "TF_Network_Base/modules/hub_network"
  })
}
Explanation:
- This block calls the reusable
hub_networkmodule and passes environment-specific variables. - The
providersblock ensures that resources are provisioned under the Admin subscription, using theazurerm.hubalias. - Tags are merged with a base tag set for consistent resource tagging, improving traceability and cost reporting.
📄 terraform.tfvars
organization        = "dv"
environment         = "admin"
owner_name          = "thatSREguy"
vnet_address_spaces = "10.0.0.0/16"
location            = "EAST US"

subscription_id = "xxxxxxxx-xxxx-xxxx-xxxx-xxxxxxxxxxxx"
tenant_id       = "yyyyyyyy-yyyy-yyyy-yyyy-yyyyyyyyyyyy"

subnet_names = [
  "bastion-subnet",
  "firewall-subnet"
]
Explanation:
- Holds all input values used by the module in
main.tf. - Keeps your configuration declarative, clean, and portable across environments.
- The
subscription_idhere is used in the Hub provider block inproviders.tf.
Using the Spoke Module – dev_network
📄 providers.tf
terraform {
  required_providers {
    azurerm = {
      source  = "hashicorp/azurerm"
      version = "~> 3.0"
      configuration_aliases = [azurerm.hub, azurerm.this]
    }
  }
}

provider "azurerm" {
  features {}
}

provider "azurerm" {
  alias           = "hub"
  subscription_id = var.hub_subscription_id
  features        = {}
}

provider "azurerm" {
  alias           = "this"
  subscription_id = var.subscription_id
  features        = {}
}
Explanation:
- The
azurermprovider is defined twice using aliases:azurerm.this→ for creating resources in the Dev (Spoke) subscription.azurerm.hub→ for referencing resources in the Admin (Hub) subscription, such as for VNet peering.
💡 Note: The dual-provider pattern is critical for multi-subscription designs, it enables secure and isolated deployments while allowing shared services connectivity.
📄 main.tf
module "virtual_network_spoke" {
  providers = {
    azurerm     = azurerm.this
    azurerm.hub = azurerm.hub
  }

  source                      = "../../modules/spoke_network"
  organization                = var.organization
  vnet_address_spaces         = var.vnet_address_spaces
  subnet_names                = var.subnet_names
  environment                 = var.environment
  location                    = var.location
  enable_vnet_peering         = var.enable_vnet_peering
  hub_virtual_network_name    = var.hub_virtual_network_name
  hub_virtual_network_rg      = var.hub_virtual_network_rg

  tags = merge(local.base_tags, {
    environment = var.environment
    TF_Module   = "TF_Network_Base/modules/spoke_network"
  })
}
Explanation:
- This block provisions a Spoke Virtual Network for the Development environment by calling the
spoke_networkmodule. - The
providersblock ensures that resource provisioning occurs in the correct subscription:azurerm.this→ for Dev resourcesazurerm.hub→ for referencing Hub VNet (used in peering)
- The
enable_vnet_peeringflag allows you to toggle peering logic, making the module flexible and reusable for environments that may or may not require Hub access. hub_virtual_network_nameandhub_virtual_network_rgare passed to enable bi-directional VNet peering to the Hub.- Tags are applied using
merge()to maintain consistent resource metadata across environments.
📄 terraform.tfvars
organization        = "dv"
environment         = "dev"
owner_name          = "thatSREguy"
vnet_address_spaces = "10.1.0.0/16"
location            = "EAST US"

hub_virtual_network_name = "dv-admin-eastus-vnet"
hub_virtual_network_rg   = "dv-admin-eastus-vnet-rg"

hub_subscription_id = "aaaaaaa-aaaa-aaaa-aaaa-aaaaaaaaaaaa"
subscription_id     = "bbbbbbb-bbbb-bbbb-bbbb-bbbbbbbbbbbb"

subnet_names = [
  "web-subnet",
  "db-subnet"
]
Explanation:
- This file contains environment-specific input values for the module, making it easy to customize each deployment without altering the module code.
hub_virtual_network_nameandhub_virtual_network_rgensure that VNet peering references are correctly resolved to the Hub.- The
subscription_idandhub_subscription_idensure that the module is deployed in the right Azure subscriptions as per your architecture.
Provisioning the Infrastructure
Once you've set up your Terraform configuration for the environment (in this case, admin_network), you can go ahead and provision the resources using the standard Terraform workflow: init, plan, and apply.
✅ Step 1: Initialize Terraform
Navigate into the environment directory (e.g., environments/dev_network/) and run:
terraform init
This command does the following:
- Initializes the working directory.
- Configures the backend (
backend.tf) to use Azure Blob Storage. - Installs required provider plugins.
- Verifies that all modules are downloaded and available.
💡 If this is the first time you’re running init, Terraform will also create a state file in the specified Azure Blob container.✅ Step 2: Review the Execution Plan
Before creating any infrastructure, always run a plan to preview what Terraform intends to do:
terraform plan -var-file="terraform.tfvars"
This will:
- Show you a list of resources that will be created, changed, or destroyed.
- Validate that all variables and provider configurations are working correctly.
💡 Running with-var-fileensures you're using the specific values declared in yourterraform.tfvars.
✅ Step 3: Apply the Infrastructure
Once you’re satisfied with the plan, apply the configuration to provision resources:
terraform apply -var-file="terraform.tfvars"
Terraform will show the same execution plan and prompt you for confirmation (yes).
You can also auto-approve in CI/CD or automation scripts:
terraform apply -var-file="terraform.tfvars" -auto-approve
Verifying Your Resources
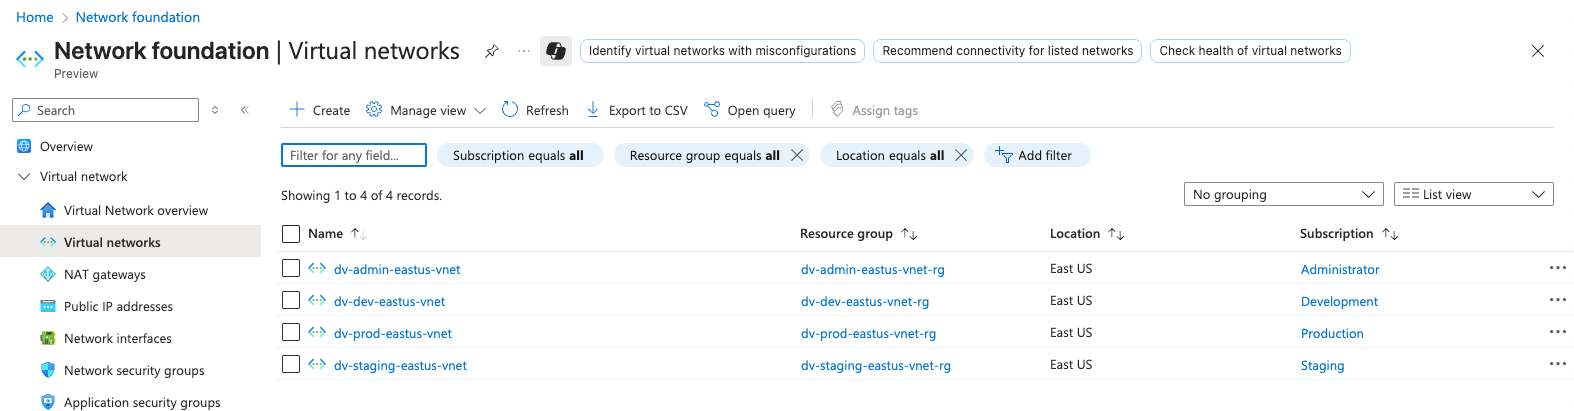
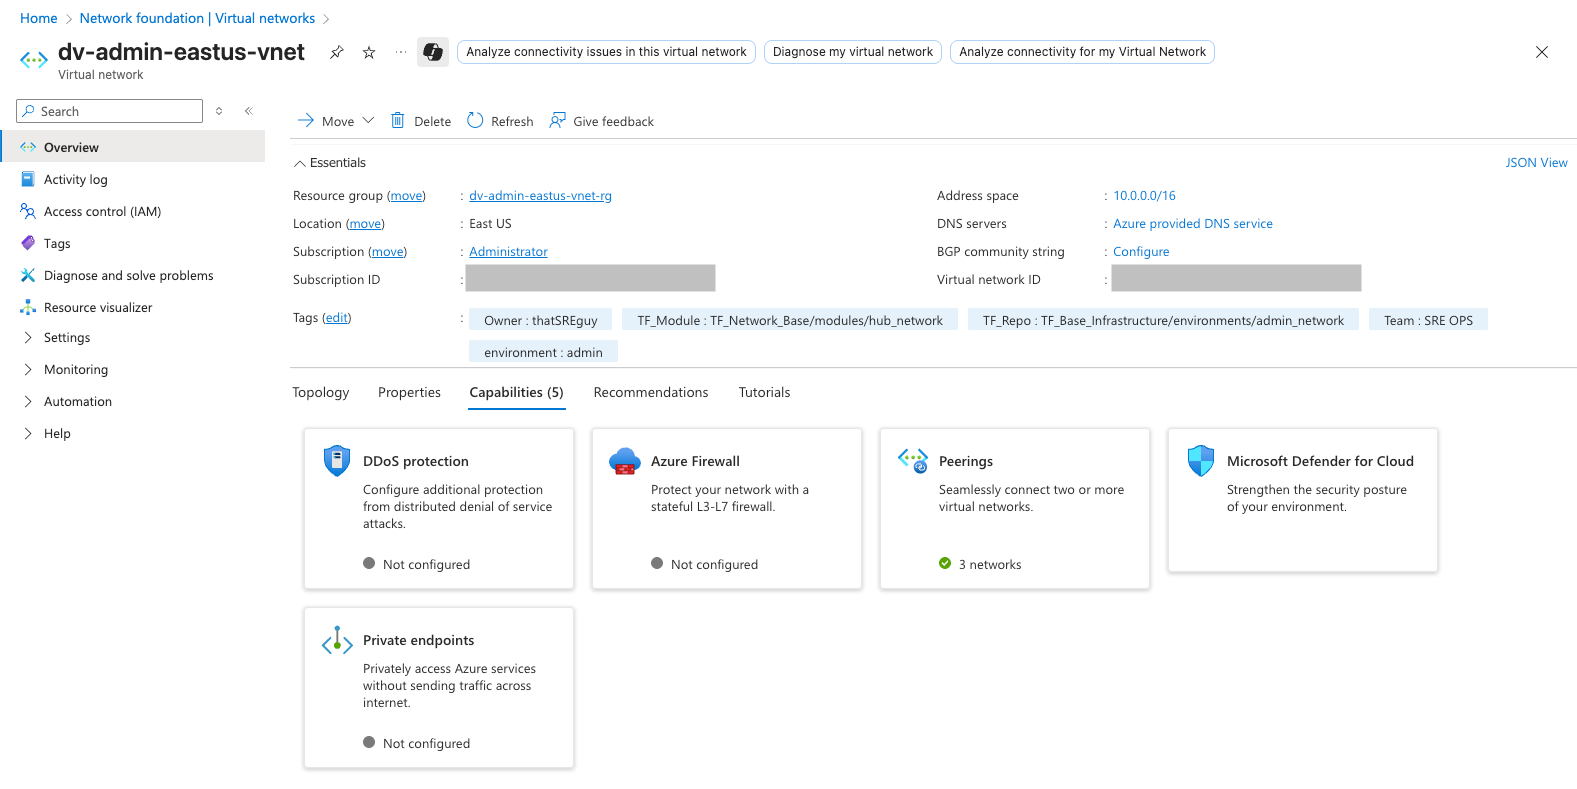
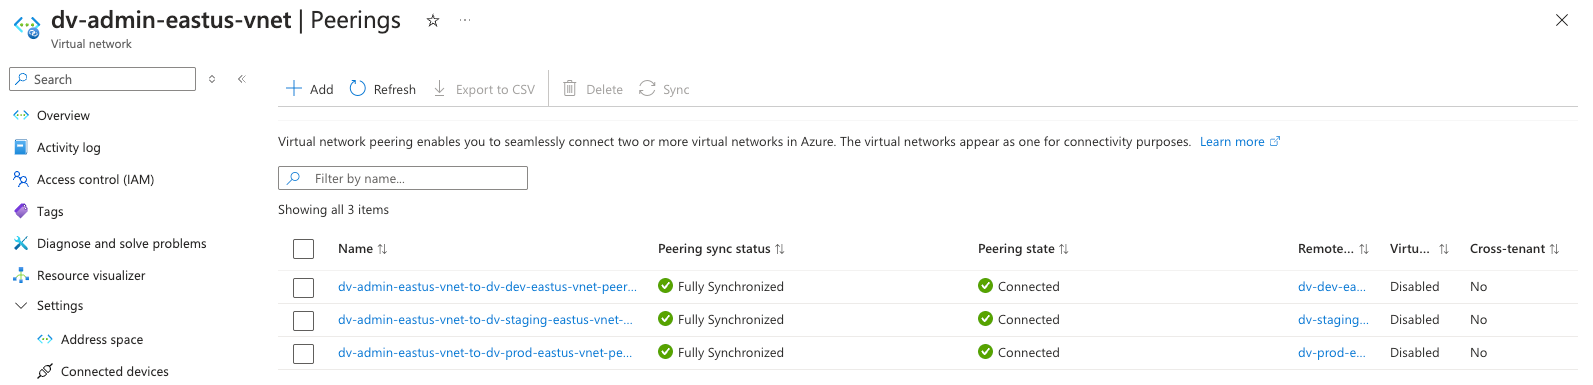
After a successful apply, you can:
- Visit the Azure Portal and verify the VNet, subnets, and peering connections.
- Check the Terraform state file stored in the Azure Blob Storage container.
- Use
terraform showto inspect the current state from your terminal.
Screenshots:

Conclusion
You’ve now laid the foundation for a robust, scalable, and modular Azure infrastructure using Terraform, one that’s designed to support real-world workloads across multiple environments and subscriptions.
From defining reusable modules and structuring your environments to provisioning Hub and Spoke networks with remote state management, this setup forms the backbone of any modern cloud architecture.
Thanks for following along, and if you found this helpful, feel free to share, bookmark, or fork the repo and start customizing it for your own use cases. 🚀
📂 Full source code available here → GitHub Repo